I will cover the basic XT10 2″ rack and pinion focuser first. This should help new owners of XT’s and Guen Sheng dobs get the most out of the stock focuser.
First of all, you cannot break the focuser unless you get really, really mad and bash it with a hammer. You can take it off the scope, take all the screws off and put it back on without breaking it.
But, you can knock it out of alignment if you mess with the collimating screws. If you really want to mess with these, read the owner’s manual where they recommend not to. That advise is germane. If you still want to mess with them, then read my squaring the focuser section on how to get the focuser square again.
The first thing you should do with the focuser is take it apart and remove all the concrete glue that the manufacturer calls grease. This is the sticky stuff inside that makes that horrible crinkling noise when you move the focuser. How do we take it apart?
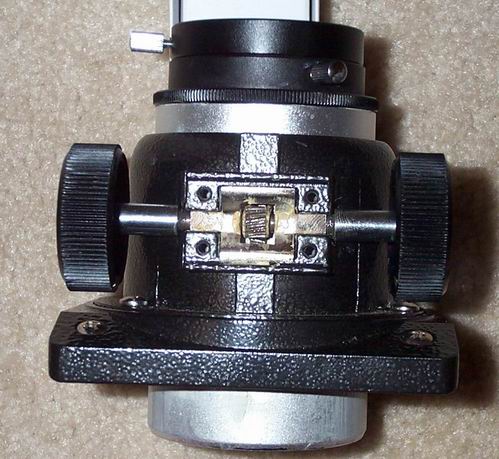
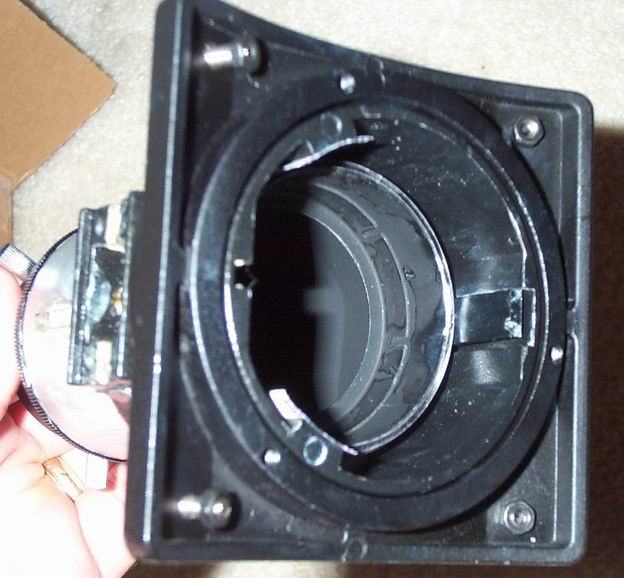
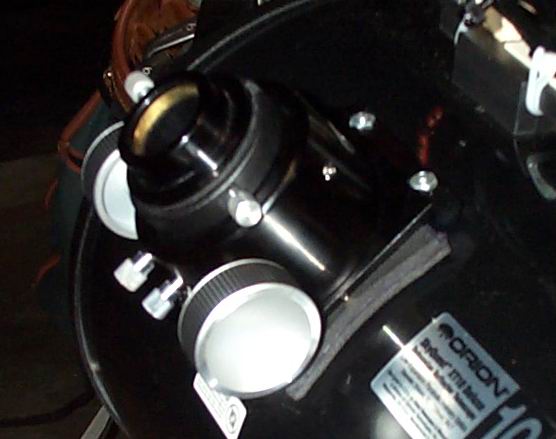
1. Remove the 4 screw that hold the pinion gear cover plate on. They are the 4 screws in the middle of the first picture:

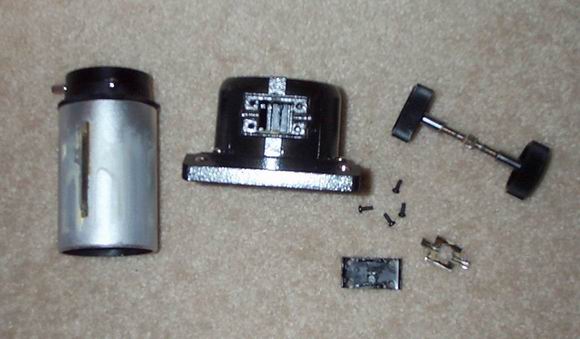
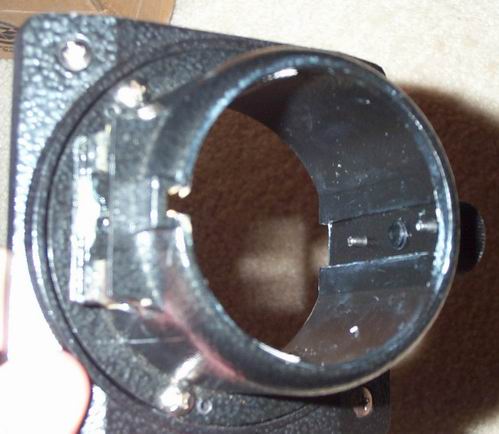
You will see the metal retaining clip thingy. It goes back in a certain way as shown in the picture. Now lift out the pinion gear (the thing with the focus knobs on it) and pull the draw tube out of the top. You may see a piece of plastic fall out of the focuser. It’s shown here:

That piece of plastic sits on two tiny allen head screws and the focus lock knob. These allen head screws are what we will use later to adjust the slop out of the focuser.
Now, use some goof off, windex or some such cleaner (no acetone, it’ll eat the paint) to get all that Chinese glue out of there. Clean everything off. No lubrication and clean is better than the stock “grease”. Now, choose your grease. The best to use is white lithium grease found in the checkout line by the tool section in Lowe’s. Actually, any home store will sell it. I have also used spray silicon, WD-40, hair clipper grease and motor oil. Just be careful not to gob it on so thick that it will drip onto the optics. Don’t spray it on the focuser, if it’s a spray lubricant. Spray it on a paper towel and then apply it to the focuser parts.
Now you can put everything back together, being careful to get the pinion spring thingy on correctly. The plastic part that may or may have fallen out has two indents in the back that fit the little allen screws. Make sure you match them up. Finally, be sure the pinion gear is centered when you put the metal cover back on. This can get pinched under the metal cover.
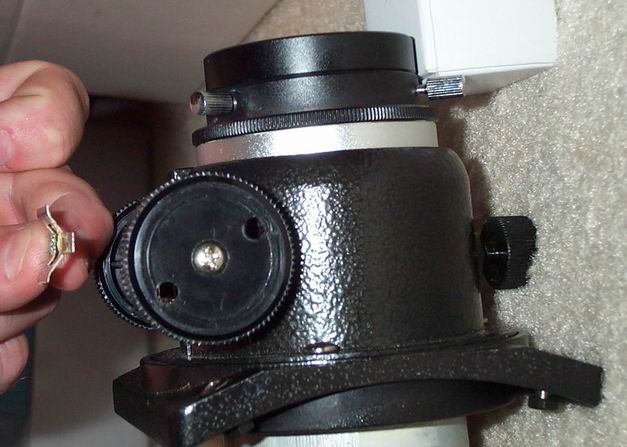
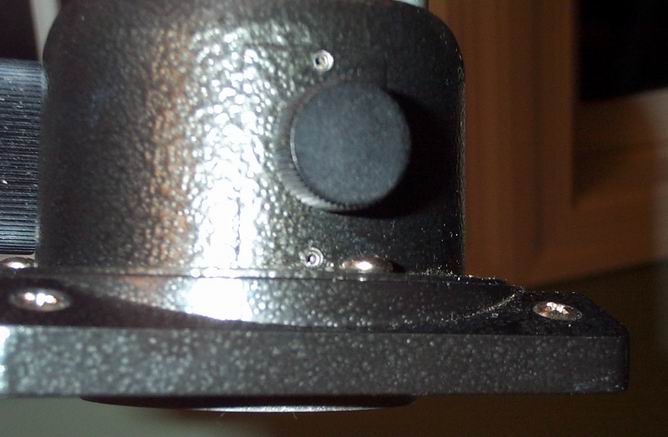
Now it’s time to adjust this puppy so it’s smooth and predictable. There are 2 places that you can adjust the focuser, neither of which is mentioned in the manual. The most important is the two allen screws shown in this picture:

They are .5mm, if you’re looking for an allen key for them. These adjust that plastic piece inside the focuser. The best way to adjust them is to slowly rack the draw tube up and down while tightening each screw until you start feeling resistance in the draw tube motion. You can fine tune this by by doing each screw a little at a time. Too tight, and the focuser will be too hard to move up and down. Too loose, and it will wobble freely.
Another adjustment that is not often mentioned is the 4 screws that hold the plate over the pinion gear. These wouldn’t seem to have any effect on focuser slop, but tighten them up too much or make them very loose and you will introduce issues. I keep them tight enough to firmly seat the pinion gear in the rack gear. You can tell if it’s too loose by pulling out on one of the focus knobs. If it has a lot of play and is easy to wiggle, you may want to tighten the 4 screws up a bit.
I use my laser collimator to check how much focuser slop there is. Put the laser in, turn it on, and rack the focuser in and out. Note any motion of the laser spot on the primary. I have found that there is a magic place where the tension is just enough to keep the slop down. If you go too tight, the spot will move even more as the draw tube tilts in the focuser body. The best I could ever get was about 1/8″ of laser spot travel on the primary.
That’s it. Your focuser is now a working machine.
FOCUS LEVER
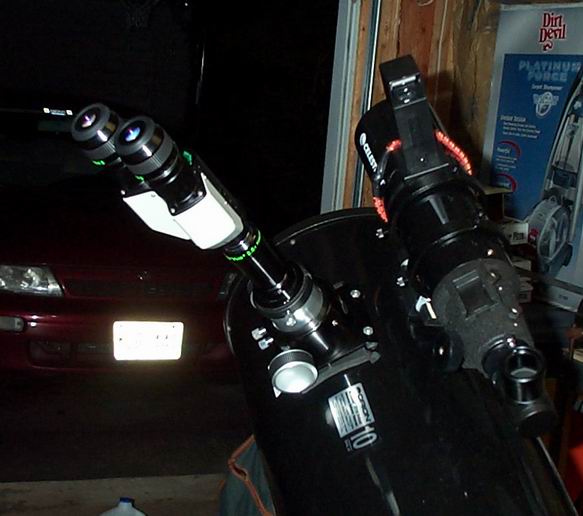
This is an incredibly easy mod that makes focusing at high powers a snap. I made this mod when I was spending a lot of time above 200x with the binoviewers in the focuser. That was a lot of weight to move around precisely. Focusing with the stock knob induced a lot of vibration and was difficult to control. So I added this little focus arm that essentially turns my focus knob into one with an 8″ radius. Here are some pics:
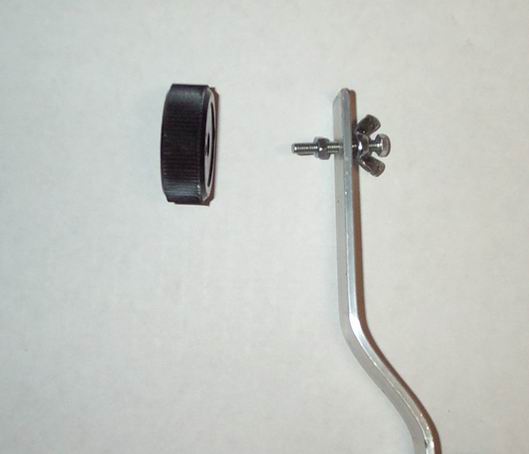
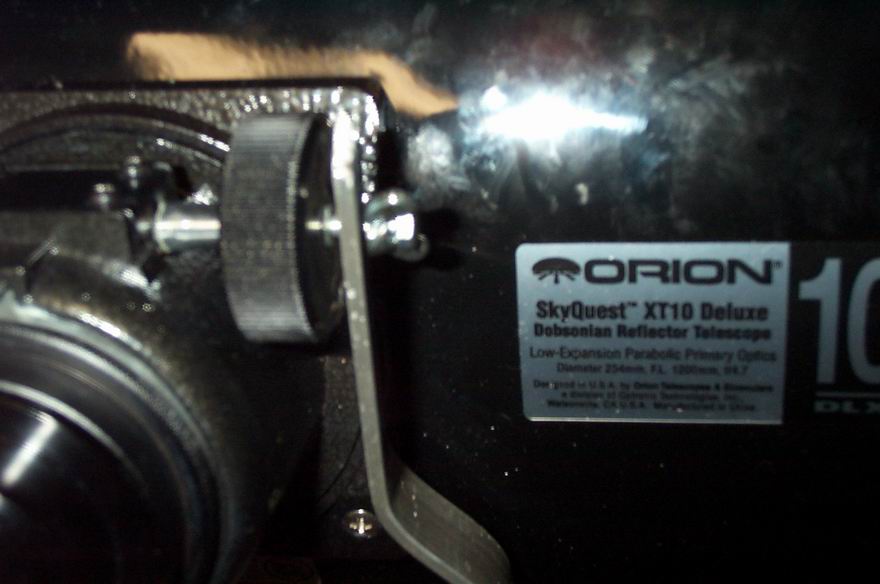
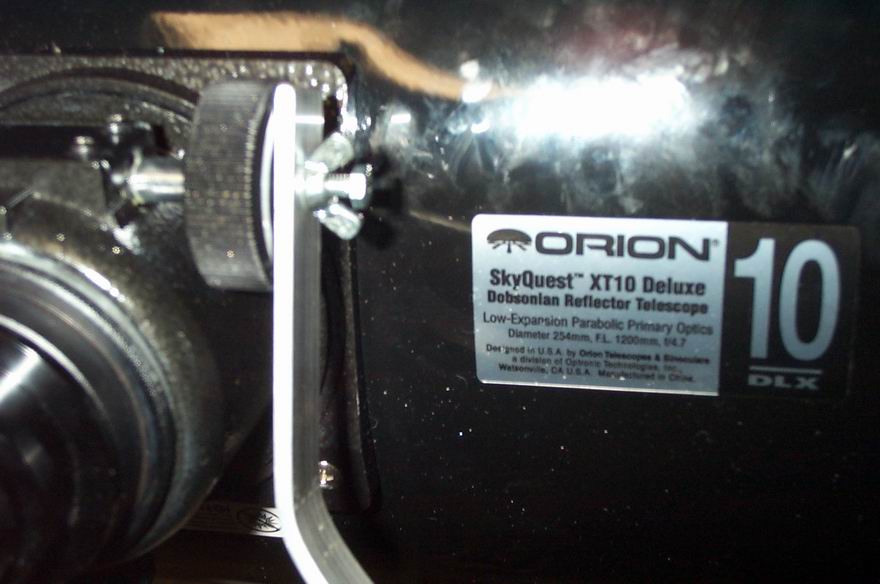
The arm is made of 1/8″ x 1/2″ aluminum. Steel was too heavy. I had to bend it a bit to clear the binoviewers. This had the added benefit of clearing the finder as well. The wingnut is used to activate or deactivate the arm. I can use the focuser normally without tightening up the arm and then when I am viewing at high power, I just tighten the wingnut and focus on an 8 inch knob instead of a 1.5″ knob. The reason I did this was to allow a fine focus option at high powers. With the focuser tight enough to eliminate the play, I was getting a lot of tube motion when I was trying to nail the focus. This should eliminate this.
The arm is made of 1/8″ x 1/2″ aluminum. Steel was too heavy. I had to bend it a bit to clear the binoviewers. This had the added benefit of clearing the finder as well. The wingnut is used to activate or deactivate the arm. I can use the focuser normally without tightening up the arm and then when I am viewing at high power, I just tighten the wingnut and focus on an 8 inch knob instead of a 1.5″ knob. The reason I did this was to allow a fine focus option at high powers. With the focuser tight enough to eliminate the play, I was getting a lot of tube motion when I was trying to nail the focus. This should eliminate this.
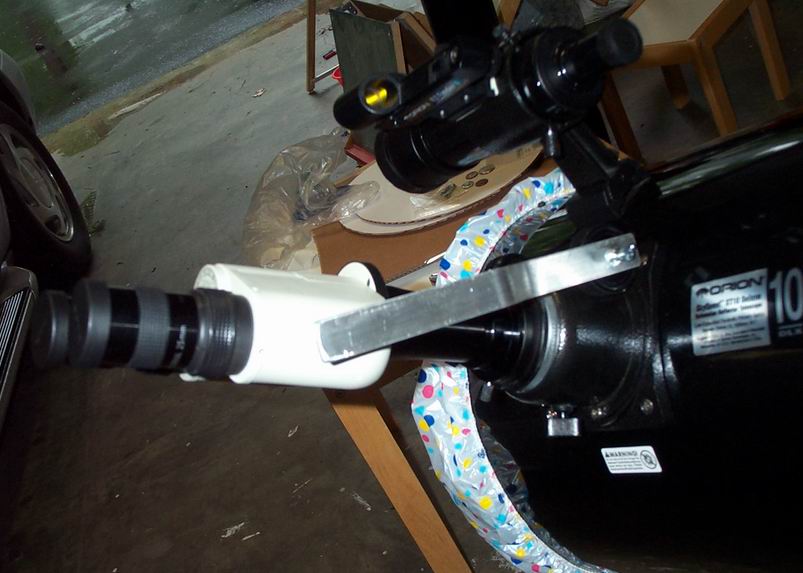
I also made a second focus arm that is a lot easier to use, but requires some searching to make it work.
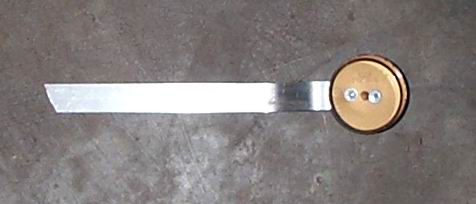

The gold part is just a cap from a can of spray paint that I found in the garage. I cut the bottom half of it off to make it less deep. It was the perfect diameter to fit the focus knobs on the crayford focuser. I tried making a focus arm like this for the stock XT10 focuser, but was unable to procure a cap that fit the smaller XT10 focus knobs. I was luckier with the crayford focuser knobs.
I used the same aluminum arm and just bolted that to the cap. The black that you see around the edge was electrical tape that I used to stiffen up the thin plastic. I used just enough electrical tape to make the fit snug. If I put too much tape on, it was too hard to remove the focus arm. Too little tape, and the arm just slipped.
This solution is much easier in operation than the wingnut version. But, it requires some luck in finding the right cap.
SQUARING THE FOCUSER
This is actually part of collimation, but I wanted to include a little trick that I found works very well with the XT10 and 4 vane spider. This will not work on a 3 vane spider telescope.
Making sure the focuser is square should only be required if you have futzed with the factory focuser collimation (you know those focuser collimation screws you weren’t supposed to touch) or maybe you’re just curious like I was. Well, in all honesty, I messed with the focuser collimation screws. You see, my secondary was not centered under the focuser, and I had run out of screw length to move it any further down the OTA, so I tilted the focuser to center it up. Big mistake. The focuser must be square with the OTA and should never be adjusted in order to center the secondary.
So, here’s a quick way to check it. First, you have to remove the secondary. Be sure to do this with the OTA horizontal so you don’t drop anything on the primary.
Now put your laser collimator in the focuser.
Now, go get your handy metal square that has the nifty sliding ruler part on it. Here’s a picture of what we’re going to do:
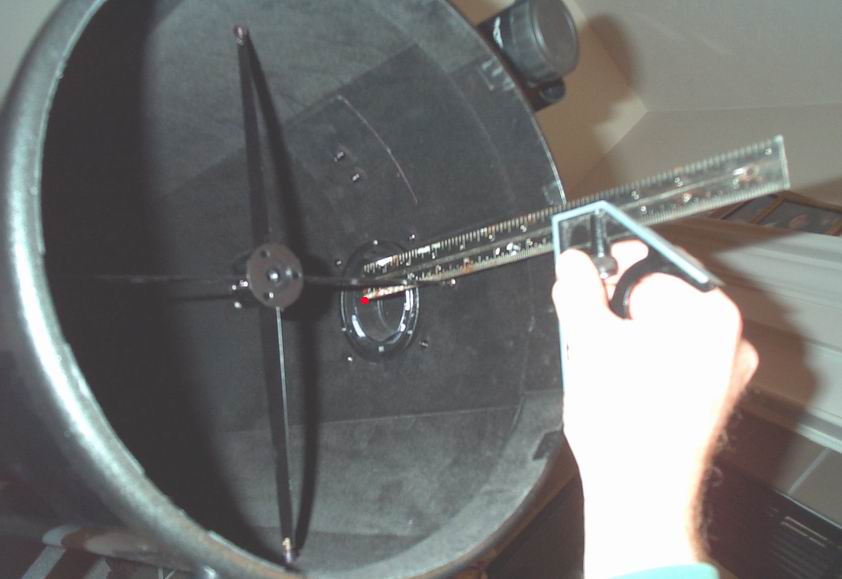

Set the short part of the square flat against the front of the OTA and slide the square down until the metal ruler part is resting on the spider vane. Not the round threaded part of the spider holder, but the spider vane itself. You will have to tilt the ruler a little to get past the round threaded part. The laser spot should be right on the bottom edge of the metal ruler. If it’s not, then something is very wrong with the focuser adjustment, or this method won’t work for your XT10. Now slide the ruler in or out until the laser spot is right on the bottom corner of the ruler. Look closely at the left hand picture above and you will see the red dot representing the laser spot. Put the square on the other side of the OTA as shown in the right hand picture. Again, you will have to tilt the metal ruler part to rest it on the spider vane. If the focuser is square, the laser spot will be right ton the top corner of the ruler. If it isn’t, adjust the focuser until it is.
Three assumptions must be made in order for this to work:
1. The front of the OTA is square with the sides of the OTA
2. The attach points for the secondary spider vanes are exactly opposite each other
3. The laser is square with the focuser.
All 3 of these assumptions seem reasonable enough to me, so I think this is a quick and easy way to square the focuser.
There are other, more complicated ways to square up the focuser but I’m not sure I completely understand how they work. So, you can ask the question on the Skyquest group or do some research on the web for more info.
CRAYFORD FOCUSER
Even though I had gotten the stock XT10 rack and pinion focuser to function well, once I added the binoviewers, it was not up to the task of focusing the heavy train at high powers. The play inherent in the rack and pinion design combined with a very slight amount of image shift at high powers made focusing extremely irritating. This did not meet my number one criteria for every subsystem: it must be transparent in use.
So I started looking for alternative focusers. I managed to try the 3 big name focusers, JMI, Feathertouch and Moonlight at the Mason Dixon Star Party in Pennsylvania. The Feathertouch and Moonlight had superior motion to the JMI DX-1. I sent a few emails and made some phone calls to the Feathertouch and Moonlight folks to try and determine how I could install one of these masterpieces on my XT10. Both would require base adaptors and long draw tubes and would run upwards of $350 after all these extras were included.
The problem was that these focusers are low profile focusers. This is nice for dobs that are designed for low profile focusers, but not for the XT10. The XT10 focuser stands proudly tall at 3″ above the OTA fully retracted. These fancy focusers were a paltry 1.5″ tall fully retracted. There are many technical reasons why a low profile focuser is desirable, but none of these apply when trying to replace the stock XT10 focuser. You need to match the same travel requirements as the stock focuser.
I could solve this problem by adding riser plates under the low profile focusers to bring them up to 3″. But adding 1.5″ of plates under a $300 focuser seemed a bit silly and would probably have looked dumb. I could have purchased either the Feathertouch or Moonlight with a really long draw tube, but that would look stupid as well. In either case, baffling the focuser to keep out any stray light would have been a difficult task.
So, I had given up on the new focuser idea for a while until a nice gentleman on the Skyquest Yahoo group mentioned a crayford focuser that he had purchased from William Optics. I had not seen this focuser in my earlier quest and took a keen look at its specifications. The price was right @ $139. The specs looked good. Hmmmm… So, I ordered one right away from Anacortes.


Here is my report that I filed on the Skyquest group:
Mechanically, it is solid. Not as over engineered as a moonlight or feathertouch, but well made. Smooth as any moonlight or feathertouch I have played with, and better than the JMI crayfords I have tried. No slop at all when changing focus direction.
I do have an issue with tension when the big, heavy binoviewer train is installed. The crayford design is susceptible to this phenomenon, and the William Optics is no exception. With all that weight, the focuser wants to slide all the way in. Luckily, William Optics has been kind enough to include a tension adjust knob to take care of this. It works very well.
Dave had an issue with his not allowing his ep’s to focus in his XT8 after it was installed. We have communicated a lot in the past week and I think I will be ok with my configuration. I need 3 5/8″ -4 11/16″ travel as measured from the top of the OTA to the bottom shoulder of the ep. I measured about 50 configurations of ep’s, binoviewers, correcotors, barlows and powermates. That took a while. That’s 1 1/16″ of required travel. I was worried when Dave reported that his focuser only had 7/8″ travel. I was relieved when I measured mine and got 1 1/8″ travel. With my TV high hat 2″-1.25″ adpator, I can just slap the focuser on the tube and be good to go.
The 2″-1.25″ adpator that is included with the focuser gives you the option of dialing in a height, to a degree, and I could use that one instead of the TV to get my required travel. But the TV has a nice compression ring in the 1.25″ part where the William Optics adaptor just has a set screw.
Upon first glance, the baffling inside the draw tube looked to be less than sufficient. But when you look closer, you can see that it is a nice design incorporating hundreds of little ring baffles. I compared it to flocking paper on the inside and the stock baffling is very good.
Installation was not difficult and careful measuring and drilling resulted in no shims required. I was concerned about baffling between the draw tube and OTA when the focuser was racked all the way out. The hole in the OTA is bigger than the outside of the base plate on the crayford focuser. Simple weather stripping would work for keeping light out, but I was looking for a tighter solution. I used a mouse pad. I cut two squares that matched the bottom of the base plate plus a 1/4″ on each side to cover the bigger hole in the OTA. Then I stacked them and cut holes that matched the outside diameter of the draw tube. I then cut a piece of flexible cutting board (thanks Gene) for the inside of the OTA. This was larger than the current hole in the OTA and also had a hole in the middle that matched the diameter of the draw tube. It is held in place by the bolts that hold the focuser. The result was a nice tube that surrounds the draw tube and makes a great baffle.
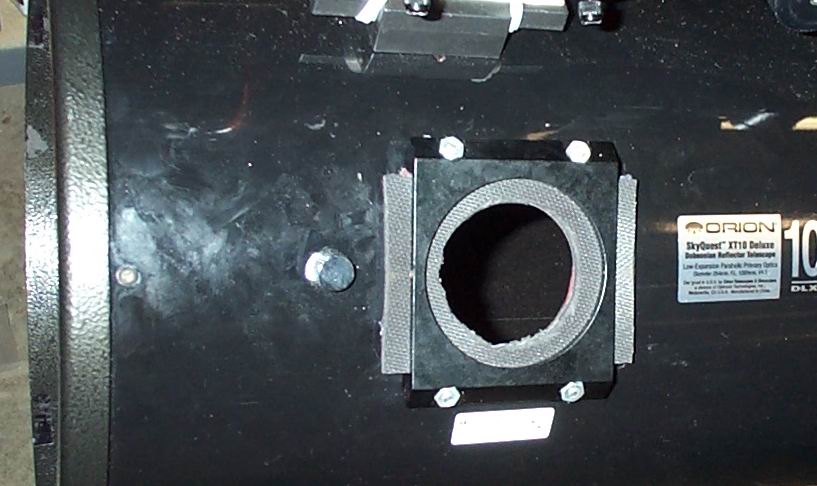
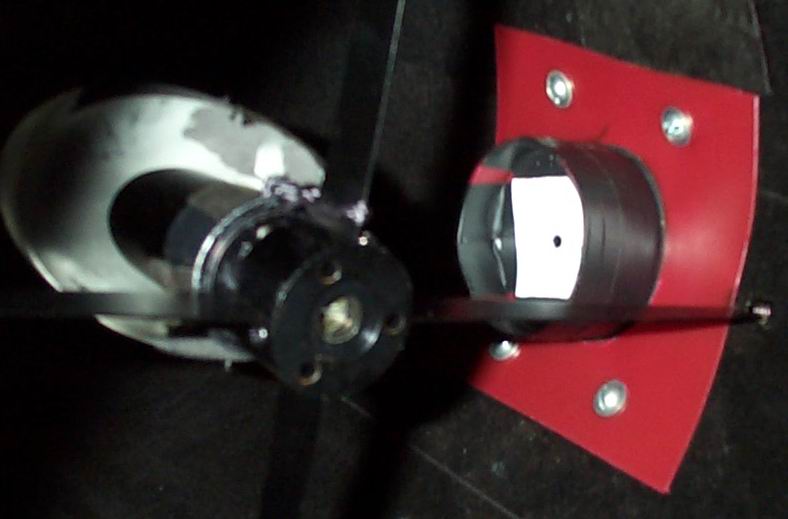
This is a pic of the mounting plate with the focuser assembly removed. A nice touch that made it easier to mount. You can see the stacked mouse pad cutouts extending past either side of the baseplate. This is what covers up the part of the original hole that extends beyond the new focuser base. I made the mouse pads too wide on purpose. I can shave another 3/16″ off each side to clean it up a bit.
One thing that always bugged me about the way the stock focuser was held on was that the nuts, when tightened, pulled a localized area around them up towards the bolt head. This caused an unsightly deformation in the area around the nuts. I had to use a c clamp to flatten these deformation out before installing the crayford. Just a characteristic of the stock focuser.
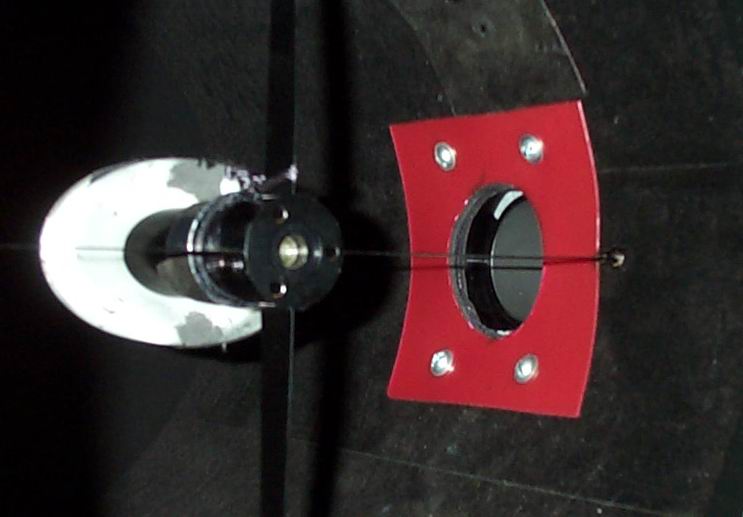
You can also see how the stacked mouse pads form a tunnel of sorts through the OTA. The hole looks off center because the picture is taken off center, but it is actually dead center. The mouse pads are a gasket of sorts that keeps all the light out of the draw tube. Some light is spilling in around the top and bottom of the base and can get inside the OTA through the old screw holes. So, I added this to the inside of the OTA:

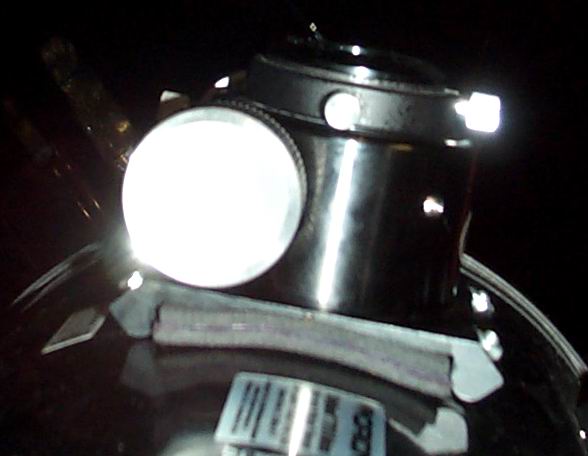
This is the piece of flexible cutting board I bought at Wal Mart. Nice red color, huh? It will get flocked when I get some more flocking paper. I’ll put some felt on it for now. This piece acts as a gasket to prevent light from getting inside the OTA. Works very well. Also note the focuser drawtube fully extended into the OTA. Nice fit through the mouse pad and cutting board gasket.
This is the draw tube racked all the way out. Still a nice sealed light pipe going to the bottom of the draw tube. No stray light here.
A pic of the new MEBLSPT. The old one is available, if someone wants to try the barlowed laser method on their stock XT 2″ focuser.
A view from the side with the included adaptor at it’s lowest position. Here’s another stock shot from Anacortes:
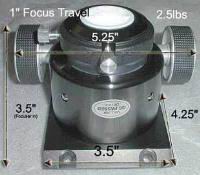

This is the same adaptor pulled out a bit:
This extended configuration can help with focusing ep’s that need a lot of back focus. It is rock solid even extended. The brass clamping ring on the 2″ part helps keep it solid.
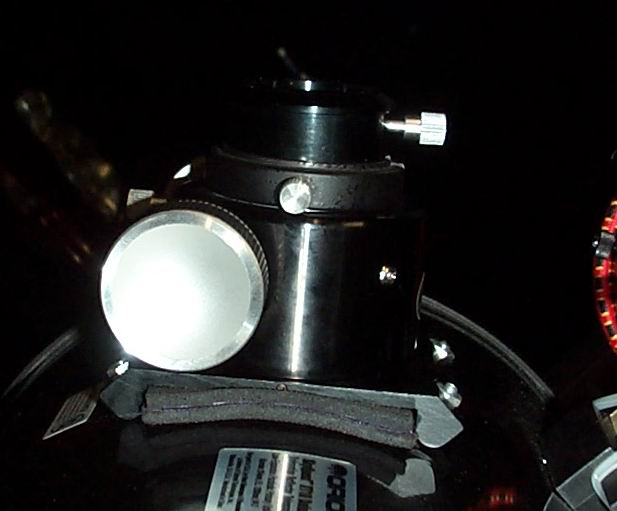
Here’s a pic with my televue high hat adaptor:
Check out the size of those knobs. 1 7/8: in diameter.
Like I mentioned before, I’m using the TV adaptor because it has the brass clamping rings. The adaptor that’s included could have given me the same height adjustment I needed as well.
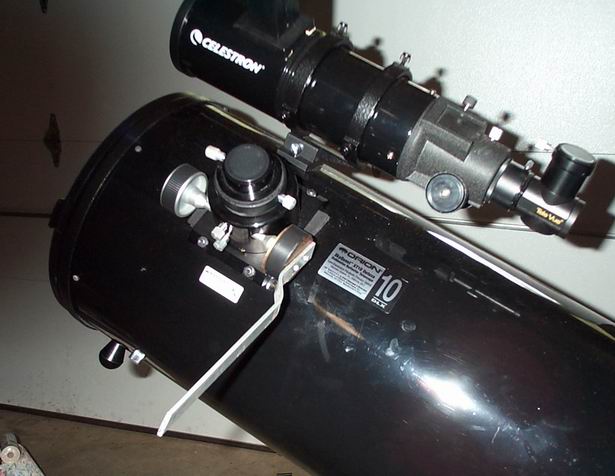
Here’s a pic with the bino train loaded up:
Probably about 3 lbs worth of glass hanging on an 8″ moment arm. It keeps it right where it should be.
I tested the focuser for square using my method described in other posts. The focuser was square as installed. I put the secondary back on and it required no adjustment from the position it was in when I took it off. I purposely left the secondary tilt screws in the same spot to QA how the focuser install went. Surprisingly, the secondary required no adjustment at all.
Testing revealed very good results. There is ZERO focuser slop with the laser installed. None, notta, zip. Motion is very smooth even with the tension knob tightened all the way (this is required for the binoviewers). The big test was the binoviewer with 2x corrector on top of a powermate. No spot shift from the laser only test. This is very good news. Even with the heavy binos and powermate, the focuser holds the laser spot in place.
The actual installation took about 10 minutes (plus another 15 to make a new barlowed laser spot target thingy). I spent about 5 hours on it, though. I did a lot of measuring and just looking at the base plate and such. If I was off by 1/16″, I may not be able to get my ep’s and binoviewers to focus. I thought about shifting the focuser forward 1/8″ or so to allow the secondary to move forward, but opted against this. I just wanted to get the focuser back in in the exact same spot as the old one.
The good news is the old focuser can be put back on and it will cover up the holes that I made for the crayford. This is a nice option if I ever want to get that Tscope I’ve been looking at.
“Let me `splain. No, is too much. Let me sum up.”
Goods
1. Smooth
2. Zero focus shift
3. No mods needed to get to focus my ep’s on XT10
4. Large knobs
5. Price (compared to starlight, feathertouch)
Others
1. Not a perfect fit
2. Collimation requires shims (I got lucky and didn’t need to collimate it)
It’s staying and I am no longer considering a much pricer replacement that would require significant modification.
Here’s another report from the field:
Just got done testing all my whacky configurations with the new focuser. No troubles, mate. All of them came to focus.
So, how did it function?
Fanfriggintastic. This is just what I was looking for in a focuser. There is no doubt where in focus is (at least on the stars) The focus arm is not required for stars. Moon is coming up, so that is the next test. Mars at 400-500x this morning will be the real test. If the star test focus is any indication, this is a wonderful upgrade and well worth the $139 and time to install.
I will caution anyone looking at trying this that you should take a lot of measurements first. The focus travel and height are critical to making this a simple mod vs an impossible mod. Also, you must be comfortable with how to properly square a focuser and center a secondary. If this describes you, then this is a peachy keen addition to an already great scope.
Another bene I noticed was laser wobble for laser only collimations. I could put the laser in, yank it around and the spot would move about 3/4″ and always return to the center spot. I removed the laser and put it back in (being careful to orient the laser the same way) and the laser spot always returned to the middle of the center spot. No muss, no fuss. This would make laser only collimation (no barlowed laser) much more accurate.
Forgot to mention the compression ring style thingy on the 2″ part of the focuser. Very nice. Makes it a lot easier to switch to a 2″ ep. Also, you don’t need any messy grease.
I have been using my XT10 a lot and the focuser has become transparent. That is about the highest compliment I can pay it. It has no impact whatsoever on my viewing. It is smooth, solid and predictable. I still use a focus lever for critical focusing above 300x. It works well without the focus lever but it is very precise with it. It has handled the heavy weight of the binoviewers very well.
Was it worth $139? You betcha. I would endlessly fiddle and fuss with the old focuser trying to get it smooth and predictable without any sign of wobble. Focusing at 400x was difficult, made worse by the heavy load of the binoviewers. Now, I don’t even notice the focuser is there and that is wonderful.
Is it a good upgrade for everyone? Probably not. The stock focuser is very good and I should have been satisfied with it. But I am the fixer of things unbroken in my relentless quest to let better get in the way of good enough. I am looking for Obsession quality at an Orion price. So far, I think I’m doing allright.